روبات هلی کوپتر
BXFlyer Four Rotor Helicopter
by
Bruce J. Weimer, M.D.
THE ROBOT:

This is the finished BXFlyer with the control board attached to the airframe. The aluminum arms measure 23 inches in length from motor to motor. And the rotors measure 11.5 inches from tip to tip. The 9.6V battery pack (not shown) is then velcroed underneath the control board for flight.
BACKGROUND:
I decided to build an autonomous flying robot about three years ago. I've converted RC cars to autonomous operation, so I thought that an RC helicopter might be a good place to start. I quickly discovered that the standard helicopter design would probably be too unstable in flight for my simple navigational and programming skills - but in searching the web I stumbled across the four rotor electric helicopter platform...and I was hooked!
The first four rotor RC heli seems to have been the Japanese "Engager":
- http://www.sigmaautomotive.com:8080/TechieMon/ksaucer.html
- http://www.geocities.com/BourbonStreet/3220/gyrosau.html
As far as I can tell, the Engager was never marketed here in the US - although you can sometimes see it on Ebay. However an upgraded design is available here in the US as the "AFOT Roswell" - and through a Canadian source as the "DraganFlyer":
I, of course, bought one. As it happens, I came across the DraganFlyer first, so that's the one I bought.
There are others - Stanford, NASA and JPL together are developing a four rotor "Mesicopter" for Mars exploration, but I couldn't find a price quote ; - )
THEORY OF FLIGHT:
The helicopter has four electric motors driving four rotors - all pointing "up." Looking down on the helicopter from above, the motors / rotors can be thought of as being located on the points of a compass - North, East, South and West. The North and South motors spin clockwise and the East and West motors spin counterclockwise - I'll come back to this in a minute. Now if you rev up all four motors / rotors equally, then the helicopter will lift off going straight up. And if you then slow down the North motor while simultaneously speeding up the South motor, then the helicopter will tilt towards the North and it'll start traveling in that direction - that allows you to control "pitch". You control "roll" using the East and West motors. And remember the clockwise / counterclockwise thing? Well, as long as all four motors / rotors are all going at the same speed, then the North / South pair cancels the East / West pair's angular momentum. But by speeding up the North / South pair and slowing down the East / West pair (or vise-versa), you can make the heli rotate to control "yaw" motion! The really cool part is that by always adding to one motor the same amount that you're taking away from another motor, you control the heli without changing thrust!! (Okay, in an ideal world, ignoring the effects of friction, etc.....but close enough.)
There are at least two other considerations.
The four rotor helicopter has four rapidly spinning rotors. And to some extent they should act as four independent "gyroscopes". Therefore, at least in theory, there should be an intrinsic "gyroscopic stability" to the helicopter. In addition, since the battery pack's attached below the helicopter, the center of gravity / mass should be below the helicopter creating a "pendulum effect" that should also tend to stabilize the helicopter in flight.
But that's all just theory...I later had to keep reminding myself - crash after crash - that I HAD seen the DraganFlyer flying in videos on the internet!
AIRFRAME:
The DraganFlyer's actually a remarkably well-designed and really well-built RC helicopter. Their initial design used a light-weight "sandwiched" plastic airframe - they're now using carbon fiber rods. However, I thought that I could make it lighter and stronger - so I rebuilt the airframe using two hollow aluminum archery arrow shafts joined in the centers at 90 degrees to each other to make a "+" shape. And I then reused the DraganFlyer motors / motor mounts and rotors gluing them to the ends of the shafts with JB Weld epoxy. This ended up being lighter than the original DraganFlyer - and lighter even than carbon fiber rods. I also dispensed with the RC receiver - this thing's supposed to be autonomous - so I saved some additional weight there. And less weight means more battery / flight time! (As you'll see, I needn't have worried.)

This is a close-up of one of the motor mounts. I used the original DraganFlyer motors and motor mounts and attached them to the aluminum shafts using JB Weld epoxy. I found the little wooden "spools" at a crafts shop.
ELECTRONICS:
I used a BX24 microcontroller because I'm familiar with it, it's programmable in Basic, it's (relatively) fast, it features floating point math and it has multi-tasking. I also used a serial connection from the BX24 to a PAK pwm co-processor. I then used the PAK to drive 4 MOSFETs. And, as I've already said, I reused the DraganFlyer motors and rotors. All this powered off the DraganFlyer's 9.6V rechargeable battery pack. Then the problems started. The motors generate a LOT of EMI - enough that they kept resetting the BX24 and the PAK. I could run one motor at a time - no problem. Two sometimes. But all four at once - forget about it! It took me over a year of playing around with various combinations of PCB boards, flyback diodes and noise suppression capacitors to finally get the thing to work!
My solution eventually involved putting flyback diodes and capacitors across the motor terminals and 0.1uF capacitors across the MOSFETs while running the PAK in "equal" pwm mode.

This is the circuit board that I designed for the BXFlyer - I've removed the BX24 microcontroller from it's socket so that you can see more of the traces underneath. The PAK pwm coprocessor is labeled. The Spectron 2-axis tilt sensor sits in the center of the board. And the Dinsmore compass sits just "north" of the tilt sensor. The four MOSFETs are on the edges of the board. And a header connects each MOSFET to it's corresponding motor.
SENSORS:
Tilt sensors:
I wanted this to fly autonomously. And that meant sensors. The RC DraganFlyer uses ceramic rate gyros to dampen it's responses so that a human operator can control it. I didn't want that. I wanted it to fly by itself. And, to me, that meant it had to know to keep itself level. And I reasoned then that "level" meant a Spectron 2-axis tilt sensor. So that's what I decided to use. If you haven't used them, these are great little sensors - electrolytic fluid filled capsules with four outside pins and a fifth pin in the center. You then use them in a "voltage divide" configuration. Specifically, I programmed the BX24 to put the "North" pin high, the "South" pin low and the "East" and "West" pins tristate while taking an ADC reading off the center pin. That gave me the 'pitch' angle - reproducibly accurate to a degree or two. And measuring changes over successive readings gave me the 'angular rate of change' - no need for a rate gyro after all! Then you just do the same thing using the "East" and "West" pins and you've got the 'roll' info.
Almost.
If you keep pumping current in the same direction through these sensors you'll eventually electroplate the sensor's electrodes making it unusable. The solution's to take a reading in the "North" / "South" direction followed immediately by another reading in the "South" / "North" direction - a pseudoAC current - that cancels out the electroplating. Of course you have to do the same thing with the "East" / "West" pins. This means that you're in effect taking two readings in each direction each time, but you can average them together to reduce noise if you want to - I didn't.
Now someone's sure to object that if the helicopter goes into a steep bank, then centrifugal forces are going to create an acceleration that cancels the pull of gravity and the tilt sensor's going to be giving useless data. You're right - technically. I'd counter by telling you that if the heli's in a steep bank, then you don't have to worry about taking measurements - it's out of control and it'll crash before you can say "I told you so!"
- http://www.spectronsensors.com/spectron_sel.html
- http://www.spectronsensors.com/dual_axis_sensors.htm
Compass: So far I haven't mentioned 'yaw' control. My idea was to try to keep the helicopter pointing North. And to me that meant using a compass. I choose the Dinsmore 1525 analog compass which was easy enough to use - you just give it 5V and take readings from it using an ADC pin on the microcontroller. I was able to reproduce a benchtop accuracy of about +/- 1 degree - so I was hopeful that this would work. And the compass readings didn't seem to be affected appreciably by the four motors even running at full speed. In fact, I programmed in PID control for the helicopter's maiden flight, but because the four spinning rotors create their own intrinsic "gyroscopic stability", I'm not convinced that the compass idea actually worked...but I'm not sure that it didn't.
SOFTWARE:
As I mentioned, one of the reasons that I choose the BX24 was because it gave me floating point math in Basic.
The right way to do this then would have been to code some appropriate linear algebra flight equations into a control program - since mathematically there actually is some interaction between pitch, roll, yaw and thrust:
But as a reasonable and simple approximation, I treated them all as independent variables and programmed pitch, roll and yaw using simple PID equations. For as far as I got with the project, this seemed to work well enough.
TEST FLIGHTS:
I had lots of test flights. At first I "flew" the heli tethered and mounted to two wooden posts so that it could "roll", but it couldn't actually go anywhere - that let me test my PID software. Then later I tested it in short unconstrained flights with the battery pack - flights of only 3 - 5 seconds. My hands were never far from the heli during those "flights." By the way, I can attest to the fact that the plastic rotors sting when they hit you - but they don't actually hurt. Nevertheless, it's a good idea to wear eye protection and keep innocent bystanders away. The major frustration that I had with the project was that the heli can literally tear itself apart in the blink of an eye if one of the rotors touches anything solid - the floor, a wall or a piece of furniture. And then rebuilding it's time consuming, expensive and ultimately very very frustrating.
MAIDEN FLIGHT:
Anyway, after the better part of two years - and after having solved most of the major control problems - I was ready for the BXFlyer's Maiden Flight. Remember, I didn't have an altitude sensor. So I did the best that I could under the circumstances - I had it fly straight up for 10 seconds, decelerate for 2 seconds and then turn-off to land / crash (hopefully gently) on the ground.
And it worked! In fact it survived!! I had matched the Wright brother's first flight time - I was off to celebrate!!!
SUGGESTIONS:
If I had it all to do over again, I'd start by looking for a sponsor and funding. No kidding. I easily put in a couple of thousand dollars over the two or three years that I worked on this project. And I didn't get as far as I would have liked. I'd estimate that to do the project right would take a budget of $5000 - $10,000. I'd also make the helicopter BIGGER. The new DraganFlyer X-Pro is their scaled up "industrial" version with a one pound payload carrying capacity - enough for all the electronics and sensors you'd ever need...but it costs $4997.95. Still, in this case, bigger means more stable - and therefore easier to fly. I'd also consider adding inertial measurement units (IMUs). And an altitude sensor. And, of course, a live-feed video camera.
- http://www.rctoys.com/draganflyerxpro.php
- http://user.cs.tu-berlin.de/~remuss/marvin.html
- http://autopilot.sourceforge.net/
ACKNOWLEDGEMENTS:
This was easily the most difficult robotics project I've ever undertaken. The shortcomings are my own, but the successes I owe to a number of others including Steve Vorres, Ed LeBouthillier, Alex Brown, Zenon Dragan, Mike Dammer, Richard Friedrich, Mark Johnson, Al Williams, R.C. Dinsmore and Jim Ubersetzig. And, of course, to my wife Ana - who never once asked "So what useful purpose is this thing going to serve?"
Bruce J. Weimer, M.D.
June 2003


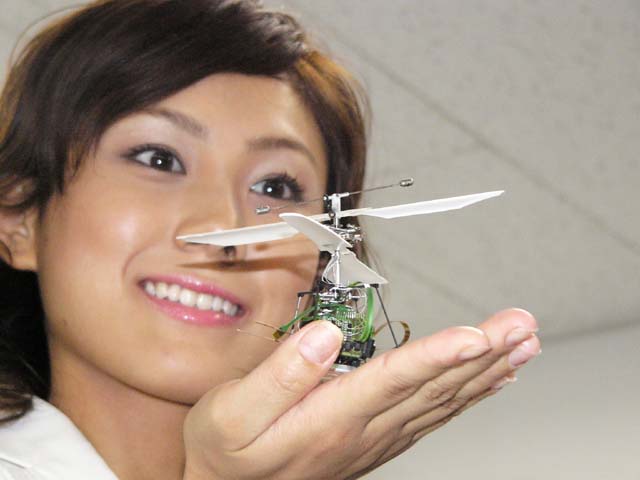 توکیو به معرض تماشای عموم گذاشته شده است. این روبات هفت سانت طول و ده
گرم وزن دارد. اگر چه خود ربات از راه دور کنترل می شود اما نیاز به سیم
برای اتصال به منبع الکتریسیته دارد. کنترل هلیکوپتر خیلی سخت تر از کنترل
هواپیماست. بالهای هواپیما در پایدار نگهداشتنش تو هوا خیلی موثر است. اما
هلیکوپتر فقط پره دارد و پایداریش کمتر است. به همین دلیل است که هواپیمای
بدون سرنشین ساخته شده ولی هلیکوپتر بدون سرنشین هنوز در حال ساخت است.
البته قابلیت های پروازی هلیکوپتر بیشتر است .
توکیو به معرض تماشای عموم گذاشته شده است. این روبات هفت سانت طول و ده
گرم وزن دارد. اگر چه خود ربات از راه دور کنترل می شود اما نیاز به سیم
برای اتصال به منبع الکتریسیته دارد. کنترل هلیکوپتر خیلی سخت تر از کنترل
هواپیماست. بالهای هواپیما در پایدار نگهداشتنش تو هوا خیلی موثر است. اما
هلیکوپتر فقط پره دارد و پایداریش کمتر است. به همین دلیل است که هواپیمای
بدون سرنشین ساخته شده ولی هلیکوپتر بدون سرنشین هنوز در حال ساخت است.
البته قابلیت های پروازی هلیکوپتر بیشتر است . 
